Thursday, May 29, 2014

Last day of School ~ project life background


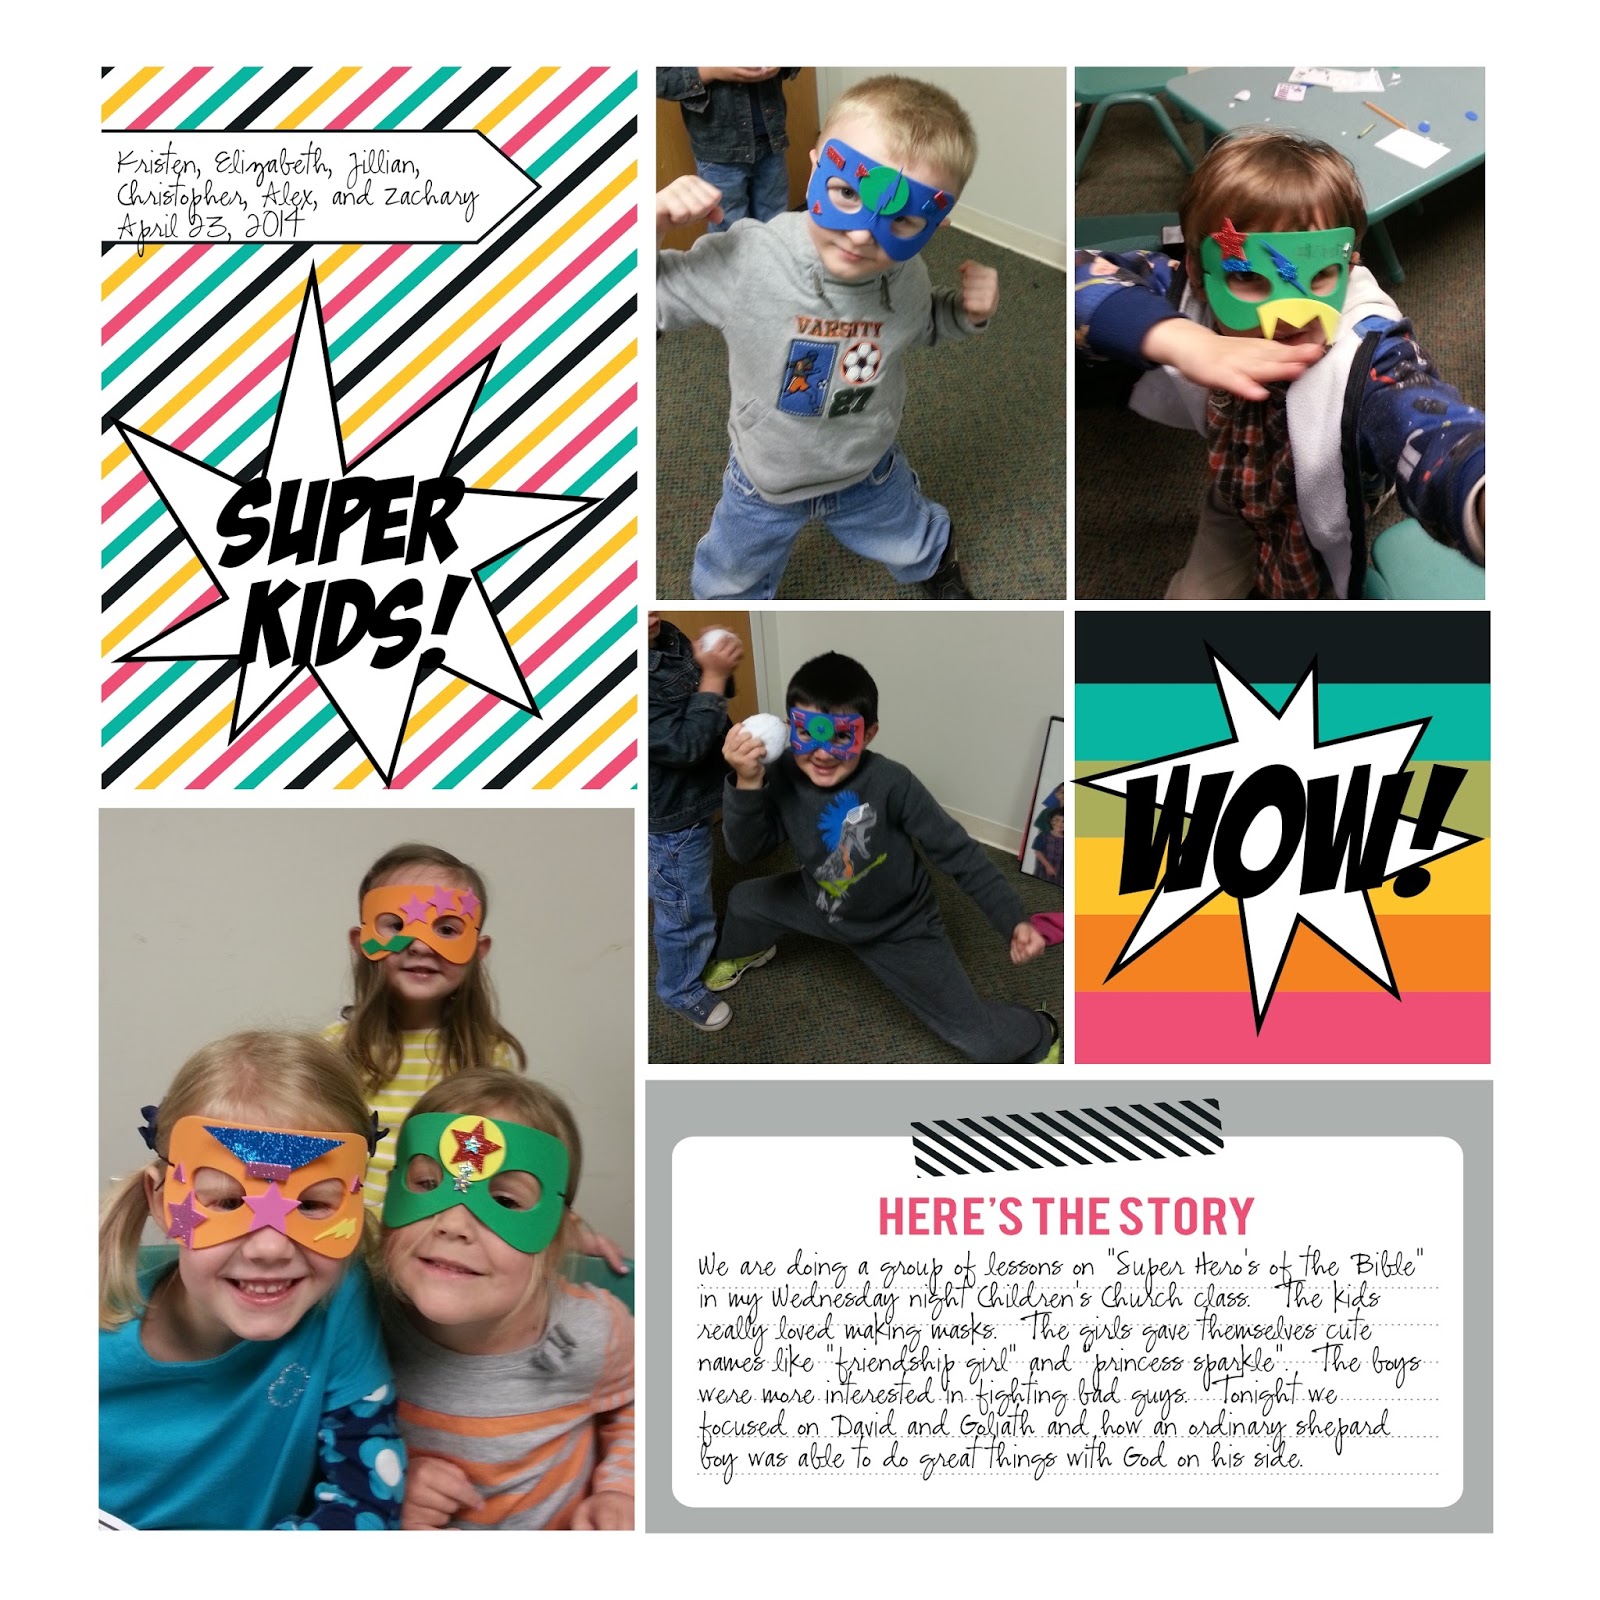
Project Life is all about documenting your life Simply.  Well, I did just that as I sat sipping my coffee this morning.  This page took just minutes and it is using a photo I took just yesterday! How's that for keeping up?  Yesterday was Jillian's last day of school.  Mixed emotions there!  We are kind of sad to see her grow up, she is at such a sweet age.
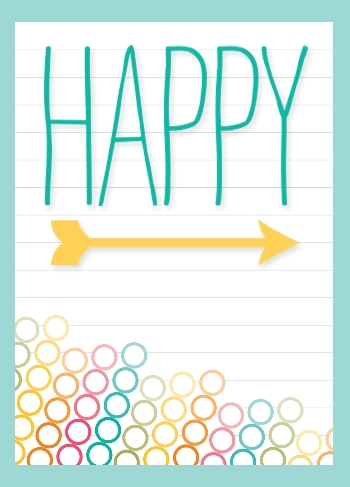
I wanted to keep it fast and simple and so I decided to use a card from the Every Day Adventure Digital Project Life collection.  This digital download is $19.95, which makes it a little pricey for a digital download, BUT you get 204 cards and 53 stamps!!  That's a big download.  And if you thing outside the box a bit, you will realize that it is sort of  like getting 204 background papers.  The 4 x 4 cards are really easy to resize, as I have done here.  All I did was add the card to the page, then right click on the card to get the edit button.  Once you have that edit box, all you need to do is change the size to 12 inches.  Easy Peasy!  You can also use the rectangle cards, but these may be a little trickier because some have patterns that may get cut off in the 12 x 12 size.  most of them are fine, but a few patterns may be a bit off, and work better as accent papers instead of the full 12 x 12 background.   The little strip of tape along the top of  my photo is also part of this download as is the heart.  They are the stamps that come with the download.
 The tape comes as a stamp brush, so it will appear black when you add it to your page.  This is perfect because you can color it to go with any page you create.  Here I chose to color it with the coloring tool so that I could make it multi colored.  I used the colors from the card background.  You can make the images larger so that they are easier to color, and you can make your brush larger or smaller too!


The words in the heart stamp are really just empty spaces, which means that you can see through them on the page.  Sometimes that is just fine, but I found it distracting since half were in front of the picture, so I decided to clean it up a bit by placing a white oval behind the heart.


 Here is a photo before the oval was placed behind the word "this"


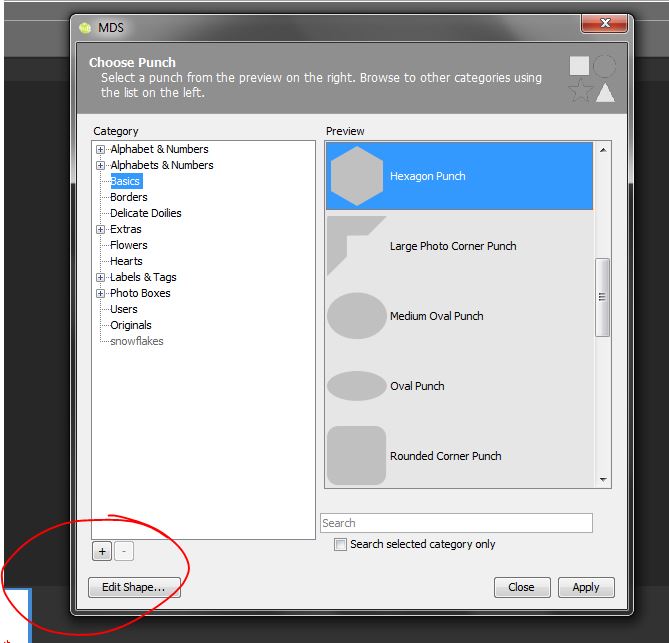
 I added an oval punch filled in with white.  I added it on top of the words I wanted to fill in to make sure I had them the right size.  You can have fun adding different colors to the oval to make the words stand out even more!

Next I sent the oval back one layer and this is the end result. You can hide parts of stamps with this method to.  Lets say you didn't want the arrow, simply add a punch or brush layer to the arrow area and color match it to the heart, the arrow will disappear!  Get rid of the word "this" and add a text box that says "love" or the names of the people in the photo.  When you work digitally you really can custom every little thing!! 


Here is just a small sampling of the cards and stamps, you can see them all by clicking this link, Everyday Adventures.


Thursday, May 22, 2014

One Template Three ways

I needed to make some thank you cards this month and thought I would take a look through some of the templates that I have in My Digital Studio.   I can across this card and loved it just as it was.  When I bought the stamp brush download "Just Believe", it came with this lovely card front.   I added the insides since they were blank.  I love that Stampin' Up! print services include cards decorated on all four sides, and I always make sure to use them all. 


Here is the back. 


Another great thing about using the pre-made templates is that you can change them up with just a few clicks. 
I just changed the colors and the sentiment.  You could make a nice gift card set with these.  Print out 3 of each style and package them in a pretty box.  Make a matching tag :) Add some matching Ribbon!  Don't you just love that MDS uses Stampin' Up! colors so that you can make fun projects that all co-ordinate beautifully together? 


Have a look through your templates and see what you can do with them. 

Tuesday, May 20, 2014

MDS Monday Challenge ~ Project Life

I completely forgot to post my MDS Monday challenge this week!!  I did the page a few weeks back and somehow it slipped through the cracks!  This weeks challenge at MDS Monday is one from me, and I wanted to use the new Project Life digital cards on a page.  I planned to mainly use the new Project Life line from Stampin' Up! on my older, non digital photos (of which there are tons) but decided that it could be fun to use the digital version as well.  Cute right?  So this week I challenged MDS Monday visitors to create a page in the style of Project Life.  You don't have to use the Project Life downloads, any of the printable pocket downloads are great, or just make you own.  I added some typical Project Life layouts at the MDS Monday site, check them out.  And if you haven't heard of Project Life, check out this video to learn more about this new partnership. 
I hope that you will give our challenge a try.  Maybe you can help me out too, I can't decide if I should do rounded corners or not.  Which do you like better?
Here is the rounded corner version.


Be sure to check out Stampin' Up's Project life samples on Pinterest too!  Now, head on over to the MDS Monday site and see what the rest of the team has come up with.

Tuesday, May 13, 2014

A second take on a challenge

Hi everyone!  I took last weeks page sketch at MDS Monday and made a card with it!  If you are looking for some more inspiration, go back through the older posts and use some of the older sketches!  A sketch is always a good place to start!   This card uses the "Follow your Bliss" download. a very fun download with lots of components.  I also used frames from Downtown Grunge, Burlap Ribbon, and Bunch of Backgrounds.


Here is the sketch!  There is still time to participate in the challenge! Check it our here...


Follow your Bliss download


Thanks for stopping by!!

Monday, May 12, 2014

MDS Monday # 66 - Shaped Cards

I have to admit, I haven't done a lot of shaped cards using MDS. I haven't mastered my Cameo Silhouette E-cutter yet either.  So when Heidi came up with this weeks challenge I was a bit worried I wouldn't get it done!  I have had a busy few weeks and kept putting it off until just at the last minute on Saturday night I sat down to do it while my husband was watching TV.  I decided to not use the e-cutter and just do it by hand to show that anyone with a printer can make a shaped card.  I looked through my stamps to see what I wanted to use and I think that was the hardest part, there were just so many great stamps to choose from.   I love the cupcakes from the "Baking up Love" download, so I decided to give those a try.


First I added the cupcakes to the page and enlarged them to be full card size.  I then placed them on the page to be in the right spots so that I could fold them and cut them out.  Next I colored the areas that I was not going to fill in with Designer Series Paper.  I printed them out on Whisper White paper.  I added a score line just past the image, so that I could fold the card and still have the two sides attached when I cut them out.


You can see in this picture where I put the score line, if you have good eye sight :)

I then folded the card and cut the layers out together.


I then printed the images again onto Designer Series Paper.  I ended up not using this one, I thought it was a bit dark, but I forgot to snap a photo of the paler pink version.  You get the idea :)


I hope that you will give this a try.  It is lots of fun.  I loved what the other team came up with, especially Heidi's Coffee Cup Card, great for Starbucks gift cards!  Head on over to the MDS Monday site and see everyone's creations.   Then, give it a try yourself! We can't wait to see what you come up with!

Baking up Love Download 


Wednesday, May 7, 2014

King of the Grill

I recently let go of my King of the Grill Stamp set.  I am using digital stamps so often, that I have been letting go of the older retired sets that I just couldn't seem to let go of for a log time.  There is only so much space on the shelves, you know?  Soon after I let it go, I wanted to use it of course!  MDS to the rescue again!!


I printed the image out onto watercolor paper and colored it in with my Aqua Painters.  Love them!


I also love that Stampin' Up! has ink and paper and embellishments that all work together perfectly.  Here I used Pacific Point Card Stock and a Pacific Point button. 


Thanks for stopping by today!!

Tuesday, May 6, 2014

Digital Motercycle!

I love to use Digital Stamps!!  I needed a motorcycle stamp for someone who recently fixed my husbands motorcycle that he crashed years ago.  It has been sitting in the shed for over 10 years!!  I didn't have a stamp set with a motorcycle but I looked at the MDS Library of stamps and there it was! And only $1.95!  I think I heard there were now over a thousand stamps available in the digital downloads.  I printed this baby out on watercolor paper and used my Aqua Painters to color it in.


I stared by spritzing the Naturals White Card Stock base with some Island Indigo ink. 


I added some Gorgeous Grunge in Basic Grey for more detail.


I used Smokey Slate, Island Indigo and even Silver Encore Ink to color the motorcycle.


A shaped clip and some bakers twine finish the card.


Thank you for visiting!


Monday, May 5, 2014

MDS Monday #65!!

Hi Everyone! It's MDS Monday time again!! This week Holly has a fun sketch for us. 


You can use the sketch as is or change up the shapes a bit to make it your own.   Head over to the MDS Monday site to see what the rest of the design team did. 


Do you see that fun confetti paper I used in my background?  Cute Right?  Yes, it is Su!! You know I only use Stampin' Up! products.  Its one of the new Project Life cards!!  Did you know there are 204 cards??  WOW!!  I choose one of the 4 x 4 cards and resized it to 12 x 12!!  And the fun flag, that is a card too!  I cropped it with the "crop shape" tool and now that is new too! 


Here is the 4 x 4 cards.  Use them as a background or as an embellishment. 


Here is how I cropped the flag.  The card just had that fun pattern at the top.    I love the "Crop Shape" tool because it allows you to have even more embellishments than you thought you did. 


I hope you will give Holly's sketch a try and show us what you made with it.  And as always, I am happy to answer any of you MDS questions!


Friday, May 2, 2014

Using Project Life Digital cards

Hi everyone!  I decided to make a few quick projects using the new Project Life digital download cards.  It is just so easy!!


 I started by looking through the pre-made photo layouts that come with the software.   I then added my photos where I wanted them, and then in the areas that didn't have photos, I deleted the photo box and added the card from the Project Life Everyday Adventures download.  I did have to edit the cards a bit, which was easy to do, I just changed the size to match that of the photo box I deleted.


 I decided to make a couple cards as well.  This was so fast and easy!
Even the arrow and "Happy" are from the same Everyday Adventures Download. 


On this card I used the color picker tool to color the "Happy Birthday" stamp, which is from the "Best Birthday Yet" download.


In case you are wondering where the comic book style star shape came from, I made it.  I edited a punch!!  I love this feature, it is so much fun!
I stared with a hexagon.  It's best to start with a similar shape, or at lease one with straight lines and points if what you want to create is very angular.  If you want something round and full, start with curvy punches.  Anyway, once you highlight the punch you want to use, click the Edit Shape button at the bottom.


Now your hexagon will open up in a new editing box. 


The first step it to click on the line you want to change, it will turn a bright blue.


Now you need to add more points.  Click on the "Insert Point".  I added two to three points to each side, all the way around the hexagon.


See all my points? 


Now I just pulled every other point into the center.  Easy peasy!


And the best part of making your own punches? They get stored in your library of punches!  you don't have to recreate it again next time.  Your new punch will be store under the "users" tab, or you can make your own tab and name it anything you want.

Thanks so much for stopping by today!!