Wednesday, February 27, 2013

Jillian's First Day of Preschool

This page is for the progressive challenge at splitcoaststampers.  A progressive page is one where each week a new element is added to the page, usually over 4 weeks.  It's a fun way to make a page, and gets your creativity flowing.  This page is super girly, which is perfect for my girly girl Jillian.  These pictures are from her first day of pre-school.  She was so excited to go to school just like her big brothers.  This page is pretty straight forward for the most part, but I thought I would point out a few things that you may wonder about, for example the broken arrow.  I wanted to make the arrow look as if it were going through the lace heart, so i had to do it in a few steps.


First I opened my stamp folder and did a search for arrows.  I decided on the arrow from the "Pencil it in" download. 
Once you've chosen your arrow, add it to your page and click on the crop button in your design center to the right.
Your arrow will now appear in a grey box
Highlight the area you want to show. click OK and only the cropped part will show on your page. 
Copy that again, but this time highlight the front of the arrow.  done!
Another thing I wanted to point out is the lace heart.  There are no lace heart embellishments, or if there are I don't have that download, so I had to make my own.   There is a pretty strip of lace in the delicate adornments download, and its a good size to crop. 
Add the lace to your page.  While it is still highlighted, click the crop button, just like you did to crop your stamp.  The grey crop box will appear.  In the center bottom of the box,  you will see a box that says "Crop Shape".  You use this button when you want to make a shaped crop as opposed to just shortening it a bit.  In this case I wanted to make it a shape.  When you click the button, you will get your punches.  Click on the punch you want, in my case the heart punch. 
You can then move the punch around to where you want it on the lace, I centered it on the pattern. You can make the shape bigger or smaller.  I had to make the heart smaller in order to get the whole shape.  Then once it was on my page I was able to make it larger.
Hope all that makes sense :)  Please feel free to ask questions if you have them.
 
Delicate Adornments Digital kit #132265 $2.95
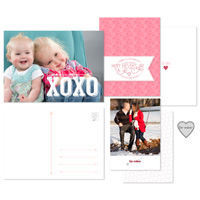
Happy Heart card template #13334 $2.95 comes with two heart themed papers, 8 stamps, 2 embellishments and 3 card templates. This is the paper I used in my flag strip and to fill one of the heart punches.
Fancy Frames download #131330 $2.95
 
 
Thanks for stopping by!


splitcoaststampers

Monday, February 25, 2013

Snow globe!

I saw a cute snow globe idea on the www.mydigitalstudio.net site and I decided to give it a try.  I have to admit that my page is somewhat plain.  I am a less is more sort of person, but it needs something.  I can't decide what else it needs so I am going to just leave it for a bit and get back to it later.  That is yet another great thing about digital scrapbooking.  I can open up my laptop and work on something without dragging out all my stamps and papers and cluttering up my dining room table.  And, I can close it up again when I'm done and go back to it later.  Love it! 
The bottom of the snow globe is actually the bottom of a cupcake punch, turned upside down.  One trick I learned for this page is altering a punch to make a new shape, like i did for the highlight on the side of the globe.  The shadow really helps to give the illusion of a sphere for the glass globe.  Here is how to do it. 
open your punches


Highlight the punch you want to edit, then click "Edit Shape" in the bottom left corner. 
 

You will now get a box that looks like this.  All the little boxes can be moved around to make a new shape.  Play around with this for a while to see all that it can do.  You can even insert more points so make even finer changes to your shape.
 
This is the shape I wanted.


Once you are done and click OK, you will get another small box to name your stamp.  Now it will be saved in your stamp folder and you can get it again whenever you want without having to re-make it.  Cool huh?  This shape is great for highlighting balloons or bubbles or whatever. 
I added color to match the background paper, then reduced the opacity to 30% so that it is just a shine on the glass.
 
The background paper I used is from the "Let it Snow" kit download. 
#132963 $9.95
Thanks for stopping by today!!
 

Tuesday, February 19, 2013

MDS Monday Challenge 7

This is the page I made with the sketch challenge from MDS Monday. The background is from the Nobody's Business download. I thought I needed some bright colors to go with the shirt my husband is wearing. I added Chevrons from the Sent with love download and colored them using the picker tool to match the shirt. I decided that it looks like Rich Razzelberry so I added some Rich Razzelberry brads and a ribbon. The Ribbon was cropped using a punch. Below is a step by step on how to crop a ribbon. 


To crop the ribbon, I added the ribbon to the page.


Next click on the crop button.
 
A new box will open with your ribbon in it.
 
In the center of this new box you will see a button that says "Crop Shape", click on that to access your punches.
 
Pick the punch you want. I chose the Flag from the Grad Party download. 
 
click OK and it will be added to your page.  I tucked it under the photo. 

Here is the sketch from MDS Monday.
 

Thursday, February 7, 2013

Let it Snow Sketch Challenge

I am playing along with the Creative Crew challenge from Splitcoaststampers.   This Challenge was a sketch challenge, which I love because it really helps me to start a page.  I used a digital kit called "Let it Snow" for just about everything on this page.  I love how the background paper already has the roughed up corners that I like so well.  Normally I have to add those details myself, but this paper already had that, so easy.   The snowflakes and frame came with the digital kit too.  I added some buttons and rhinestones.  I also put twine in the button, for some reason I can't seem to use an empty button on my "real" paper and button projects, and I guess that is continuing in my digital projects as well because I just had to add the bakers twine.  I'll keep working on that phobia and maybe you'll see a plain button in the future :)  Here is the kit...
It comes with an 8 piece stamp brush set, 9 embellishments, and 12 fun papers.  132963 for $9.95
 
Here is the sketch.  It was very flowery, but I exchanged the flowers for snowflakes.


Thanks for stopping by!!